Sunday, April 29, 2012

Harvest meals: Early spring

Garden meal: lettuce, snap peas, eggs.
 "You don't have to cook fancy or complicated masterpieces - just good food from fresh ingredients." - Julia Child
As the season progresses, I'm finding that more and more of our meals feature produce from our garden.  In fact, for over a week, we've been eating at least one meal a day that came MOSTLY from the garden.

Here are the most frequent harvest-heavy meals as of late (you might notice a trend):

  • Wilted/fried collards with eggs (poached, over easy or sunny side up)
  • Sauteed kale with eggs
  • Fresh garden salad with snap peas
  • Fresh garden salad with eggs 

Believe it or not, we aren't bored of these meals, even though we're eating one of them every day.  I mix things up by flavoring the greens in different ways (topped with sauces, chutneys, sauteed with garlic), and by using different dressings on the salads.  But really, it is the fresh ingredients that make a world of difference.

Saturday, April 28, 2012

And the tomatoes are out!

All of the tomatoes made their way to the garden yesterday.  I managed to fit 44 Rutgers determinate tomatoes and 17 Sungold tomatoes into the garden -- a few more than I thought I had room for.

The tomatoes had been looking a bit... crowded... in the house for over a week now, so my husband has been anxious to introduce them to the great outdoors. Unsurprisingly, he announced 'Let's plant out the tomatoes today!' yesterday early afternoon.  After consulting the average frost dates, and the 10-day forecast, I decided that it was safe to put them out.  So much to his delight, I said 'Sure, let's plant out the tomatoes.'
The tomato jungle.
So I brought out my two jungles trays of tomatoes, and marched them over to the garden area.  My husband wasn't far behind, so I started spouting out directions: 'This tray has only Rutgers tomatoes in it.  This tray has both Rutgers and Sungolds, but they are labeled, so you just have to make sure you grab the right type...'
Husband: 'I'm not planting tomatoes.'
Me: 'What!?!?! But you suggested it!'
Husband: 'I suggested YOU plant out tomatoes. I'm going to do things that require more manpower.'
Me: *grumbles*
And that, ladies and gentlemen, is the story of how my husband tricked me into planting out 61 tomato plants by myself.  And to be honest -- I am a bit sore from the planting out process, which I will finally get to:

The 2012 Tomato Planting Extravaganza:

Both types of tomatoes were planted with 24" spacing.

The Rutgers are a determinate type, which means they grow to a certain size and put on all their fruit.  Luckily, this size is only 2-3 ft tall, so they do not need a trellis.  They do, however, benefit from caging or staking of some sort.  I chose to stake mine, for no other reason than the fact that I had bamboo laying around.  I cut the bamboo stakes to a length of 4-5 feet.

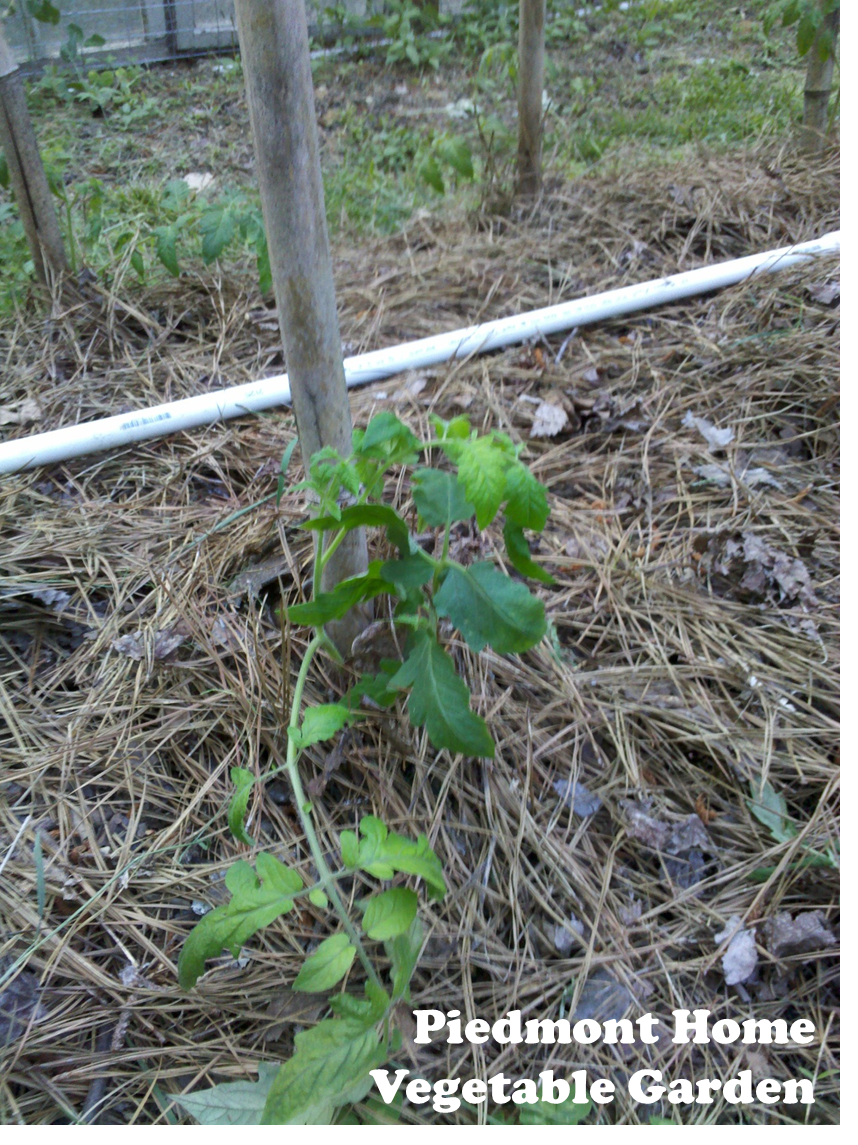
Then I dug holes in my bed, drove the stakes in at least a foot, and planted a little Rutgers plant about 4-6" deep, next to the stake.  I removed any lower branches that would have been buried.
Rutgers tomato, just after being transplanted.
As the plant grows, I will tie it to the stake as necessary to support it.

The Sungolds were planted in an area with a preexisting trellis system, since they get tall and vine-y.  My husband helped me tie cords to the top beam of the trellis supports that hang down to the tomatoes.  After I planted them, I gently wrapped the cords around the stem of the tomato.  As the plant grows, I'll continue to loop the cord around the main stem of the plant, which should aid in supporting it.  Later in the season, I can also run cords horizontally if it looks like I'll need it.
You can't see them in this picture, but there are Sungold
tomatoes along that white pipe.
Both sets of tomatoes received a thick layer of pine straw to keep the soil moist, and to prevent weeds. And last, but not least, they got a watering system (PVC with holes in it), that can hook up to my rain barrels to make watering a breeze.
A view of all 44 Rutgers tomatoes with stakes!
Oh, and in case you are wondering, my husband tilled some beds, and harvested a bunch of greens for processing.  So he did his share of labor, too.

Wednesday, April 25, 2012

This week in the garden: 4/25/12

Snap peas are fantastic -- started getting them a week ago.
Lettuces are lush and delicious now--we have a ton, and need to
start eating them as if our life depended on it to make room for the
summer crops.
The cabbages look healthy, but they've only formed little heads.
We let the kale go to flower, and now they are forming seed pods.
All chickens are in production.
Collards are huge, and going to flower.
Tomatoes are ready to go outside.


Sunday, April 22, 2012

Are we past the last frost date?

The problem with the last frost date is that it is different every year.  Some years the last frost is early, other years it comes late. So when planning to plant out frost-sensitive crops, you have to guess what the weather will do based on previous years.

Generally, you hear about the 'average last frost date'.  But I don't really like planning my planting dates based on that because it is the AVERAGE last date--meaning half of the time the last frost is before that date, and half of the time it is after.
"You mean to tell me that there is a 50% chance that I'll
endure freezing weather when you plant me out on the
average last frost date??" -Tomatoes
I'm a pretty meticulous planner, and my plants and I would really like to have more information than just the average last frost date. The best comprehensive resource for frost information I've found so far is the National Climatic Data Center website. They have information about spring (and fall) frost dates for all areas of the country. Click here for the pdf information on a bunch of North Carolina areas.

It includes 3 different temperatures (28, 32 and 36) and 3 different probability levels (10, 50 and 90). Below is the pertinent information for Chapel Hill, NC:

Better than your average last frost data for Chapel Hill, North Carolina.
I know what you're thinking: So how do you use this table? For example, let's consider the 90% probability level for the spring season at the 32-degree threshold.  The table shows the associated date is March 24. This means that nine times out of ten, a temperature as cold as or colder than 32 will occur later than March 24 during the spring season. Those aren't good odds if you are thinking about planting out tomatoes.


On the flip side, April 30 is the 10% probability level for 32 degrees. This means that 1 time out of 10, a temperature as cold or colder than 32 will occur later than April 30.  I'm willing to accept a 10% frost risk when planting out tomatoes. For more sensitive plants (like eggplants and squash) I would probably wait another week or two.


For the fall season, the probability level represents the chance of NOT having a temperature as cold or colder earlier than the computed date.

Given the above odds for various temperatures (and the projected forecast), I think I'll plant out my tomatoes sometime later this week!

Wednesday, April 11, 2012

Harvest totals: March 2012

This post is a bit late... but I did tally up our harvest totals for March and add them to the spreadsheet.  We had a lot more greens this month.  The overwintered kale and tatsoi both started to flower, so they were completely harvested, wilted, and put in the freezer to use later.

All told, we harvested almost 16 lbs of veggies and 97 eggs in March--definitely an improvement over February!


Wednesday, March 21, 2012

Planting to avoid weeding

I can't believe how much the lettuce has grown.  The lettuce bed seemed to go from small little plants to full lush lettuces overnight.  I love the look of the lettuce, and one of my favorite parts of the lettuce bed is that I haven't had to weed it--not even once.  There are a couple weeds here and there, but nothing like some of my other beds.

When I planted out the lettuces, I was careful to give them room to grow, but I planted them as close as possible (roughly 6" spacing).  This allowed me to plant a large number of plants in a small area, and the spacing allowed the leaves and roots of the plants to out-compete weeds. This also means that as I start harvesting the lettuce, I'll be giving the remaining lettuce a little extra room to spread out.

Sunday, March 18, 2012

Planting potatoes

This post is actually a bit late.  I planted potatoes on March 9th this year.  But, it's still not too late to plant some yourself!

Last year, I planted 1 lb of yukon gold seed potatoes.  Like many great garden discoveries, this was completely unplanned.  I saw some seed potatoes at the local hardware store, and I decided that I wanted them.  I didn't even have room in the veggie garden, and these potatoes were planted in my front flower bed! It turned out that this was a great decision, because the potatoes did really well!

This year, we've planted 10 lbs of yukon golds, 2 lbs of red pontiac, and 2 lbs of kennebecs. (We got a bit more ambitious this year!)

Planting seed potatoes isn't very hard, depending on your method.
Seed potatoes must have an 'eye' to grow a plant.
First, you want to pick a nice sunny spot in your garden.  You can plant the seed potatoes whole, or you can cut them into smaller pieces, so long as each potato piece has an eye.  I chose to cut the potatoes so I get more plants per pound of seed.  I cut each seed potato into 2-3 parts, being sure that each part was large and included an eye.
Seed potatoes, cut and ready to be planted.
For the gold and red potatoes, I'm using a trench method.  Basically, you just dig a shallow trench, plant your seed potatoes (eye up) in the trench, and then cover them with a couple inches of soil.  As the plants grow, you continue to hill up along the sides of the plant.  I thought this method was pretty easy, but then again I wasn't the one who tilled the soil and dug the trenches (many thanks to the Mr!).
Potato trenches.
For the kennebecs, I'm using a scatter method.  In this method, you just lay the seed potatoes on the ground and cover with mulch.  As they grow, you continue covering them with mulch.  Kennebecs are supposed to grow well in the container method, and can yield a large amount of potatoes by growing vertically.  Even though I'm not using a container, I plan on mulching the Kennebecs a lot to see if I can get more out of them this way.

I planted all of the potatoes 18" apart to allow plenty of room for growth.

I purchased my seed potatoes at Sow True Seeds, and they have more information on growing potatoes on their website.
Related Posts Plugin for WordPress, Blogger...