Showing posts with label Basics. Show all posts

Monday, July 9, 2012

The epic garden battle: Woman vs. Deer

A few weeks ago, I was wandering around the garden when I noticed some missing cherry tomatoes.  My immediate response was 'Nooo! Tomato hornworms!'

But after inspecting the plants carefully, I couldn't find any sign of a horn worm.  And it struck me as odd that all of the damage was just on one side of the tomato plants.
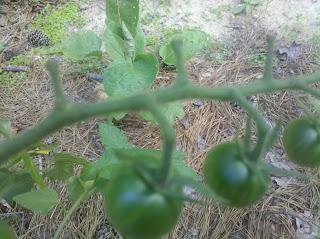
Missing cherry tomatoes?
That's when I glanced down and noticed the following footprint on the ground:

Deer print in the garden.
DEER!!!  A darned deer had gotten into my garden.  With this realization I ran around the rest of the garden and noticed all of the other damage -- multiple missing tomatoes, some munched peppers, a bunch of 'pruned' bush beans.  A deer can do a LOT of damage in a short amount of time.

Prior to this, our 4 foot fence was enough to keep the deer out. Yes, a deer CAN jump it, but I think it just didn't seem worth the effort to them before. I mean, I have PLENTY of tasty flowers that they had been eating on the other side of the house.  But now the deer has worked up the nerve to enter the garden and taste my delicious crops. Which means it will be back.

I entered panic/trouble-shoot mode.  I needed an immediate (and cheap) solution to keep the deer from returning in the evening and causing even more damage.

So here is what I did:

I had some 8 foot 2x2's laying around, so I attached a few of them to some of the 4 foot posts with screws.  I then strung  clothes line at 6 feet and 8 feet.  Next, I tied some strips of white fabric to the line.

Not the prettiest anti-deer wall.
Now, it's really not much of a physical barrier, but the deer won't know that.  I'm hoping it will be more of a visual barrier to them -- if it looks like a wall, it should prevent them from trying to jump in.

Would you jump into this?
Two weeks later -- I have found plenty of deer prints outside of the garden, but we have had no more deer visit inside the garden. Looks like this strategy is working out just fine!

Sunday, April 22, 2012

Are we past the last frost date?

The problem with the last frost date is that it is different every year.  Some years the last frost is early, other years it comes late. So when planning to plant out frost-sensitive crops, you have to guess what the weather will do based on previous years.

Generally, you hear about the 'average last frost date'.  But I don't really like planning my planting dates based on that because it is the AVERAGE last date--meaning half of the time the last frost is before that date, and half of the time it is after.
"You mean to tell me that there is a 50% chance that I'll
endure freezing weather when you plant me out on the
average last frost date??" -Tomatoes
I'm a pretty meticulous planner, and my plants and I would really like to have more information than just the average last frost date. The best comprehensive resource for frost information I've found so far is the National Climatic Data Center website. They have information about spring (and fall) frost dates for all areas of the country. Click here for the pdf information on a bunch of North Carolina areas.

It includes 3 different temperatures (28, 32 and 36) and 3 different probability levels (10, 50 and 90). Below is the pertinent information for Chapel Hill, NC:

Better than your average last frost data for Chapel Hill, North Carolina.
I know what you're thinking: So how do you use this table? For example, let's consider the 90% probability level for the spring season at the 32-degree threshold.  The table shows the associated date is March 24. This means that nine times out of ten, a temperature as cold as or colder than 32 will occur later than March 24 during the spring season. Those aren't good odds if you are thinking about planting out tomatoes.


On the flip side, April 30 is the 10% probability level for 32 degrees. This means that 1 time out of 10, a temperature as cold or colder than 32 will occur later than April 30.  I'm willing to accept a 10% frost risk when planting out tomatoes. For more sensitive plants (like eggplants and squash) I would probably wait another week or two.


For the fall season, the probability level represents the chance of NOT having a temperature as cold or colder earlier than the computed date.

Given the above odds for various temperatures (and the projected forecast), I think I'll plant out my tomatoes sometime later this week!

Sunday, March 18, 2012

Planting potatoes

This post is actually a bit late.  I planted potatoes on March 9th this year.  But, it's still not too late to plant some yourself!

Last year, I planted 1 lb of yukon gold seed potatoes.  Like many great garden discoveries, this was completely unplanned.  I saw some seed potatoes at the local hardware store, and I decided that I wanted them.  I didn't even have room in the veggie garden, and these potatoes were planted in my front flower bed! It turned out that this was a great decision, because the potatoes did really well!

This year, we've planted 10 lbs of yukon golds, 2 lbs of red pontiac, and 2 lbs of kennebecs. (We got a bit more ambitious this year!)

Planting seed potatoes isn't very hard, depending on your method.
Seed potatoes must have an 'eye' to grow a plant.
First, you want to pick a nice sunny spot in your garden.  You can plant the seed potatoes whole, or you can cut them into smaller pieces, so long as each potato piece has an eye.  I chose to cut the potatoes so I get more plants per pound of seed.  I cut each seed potato into 2-3 parts, being sure that each part was large and included an eye.
Seed potatoes, cut and ready to be planted.
For the gold and red potatoes, I'm using a trench method.  Basically, you just dig a shallow trench, plant your seed potatoes (eye up) in the trench, and then cover them with a couple inches of soil.  As the plants grow, you continue to hill up along the sides of the plant.  I thought this method was pretty easy, but then again I wasn't the one who tilled the soil and dug the trenches (many thanks to the Mr!).
Potato trenches.
For the kennebecs, I'm using a scatter method.  In this method, you just lay the seed potatoes on the ground and cover with mulch.  As they grow, you continue covering them with mulch.  Kennebecs are supposed to grow well in the container method, and can yield a large amount of potatoes by growing vertically.  Even though I'm not using a container, I plan on mulching the Kennebecs a lot to see if I can get more out of them this way.

I planted all of the potatoes 18" apart to allow plenty of room for growth.

I purchased my seed potatoes at Sow True Seeds, and they have more information on growing potatoes on their website.

Monday, November 7, 2011

Compost: basics

I have had more than one person tell me that they would love to compost, but thought it sounded too complicated.  So instead, they just threw away all of their food waste and other compost materials.

Well, I'm here to tell you that anyone, anywhere can compost! 

A passive compost pile is easy, and even if you do it 'wrong', it is much better than sending that organic material to the landfill!  It is better for the environment, your garden, AND your wallet (why buy compost when you can make it yourself?).

Where to compost:

When picking a location to compost, keep in mind that you will be visiting this pile fairly frequently.  You want it to be somewhere convenient, but preferably not too close to the door/house (the pile may not be pretty!).
Use wood pallets to make composter
You can buy a fancy composter at a hardware store, or you can make your own out of pretty much anything.  For example, I attached 3 old pallets together.  Or you can just make a pile in your yard, without any containment.  If you don't have a yard, you can compost in a tub under your sink.  With compost, the possibilities are endless.
Composter made out of wood pallets
After you pick where you will compost, you just add compostable materials to it.  Anything that you would consider biodegradable can probably be composted.

What to compost:
  • Brown yard waste (dried leaves, pine straw, twigs, etc.)
  • Green yard waste (grass clippings, pulled vegetable plants, etc.)
  • Kitchen waste (vegetable scraps, eggshells, coffee and tea grounds)
  • Household waste (tissues, scrap paper, newspaper, toilet paper rolls, etc.)
  • Livestock manure (from chickens, cows, pigs, goats, etc.)
What NOT to compost:
  • Animal products (meat, fat, dairy)
  • Human or pet feces

How I compost:

To make collecting compost easier, you can keep a container with a lid in the kitchen, specifically for compost.  If flies become a problem, you can keep the container in the freezer.  I just bring out the container, add the vegetable scraps to it as I cook, then put it back in the freezer. Once it is full, I take the compost container outside and empty it into the big pile.  I then add a few handfuls of dried leaves on top. Dried leaves are always a great addition after adding kitchen scraps!

Any garden or yard waste also goes into the compost pile: dead plants, no longer productive vegetables, fallen leaves, etc.

The pile can be turned (mixed up) every few days, every month, or never.  The more you turn it, the faster it will compost, but it will all eventually compost even if you don't turn it. 

And that's it!  Once you learn what can be composted, and get in the habit, it's actually quite easy.

For more information on compost, the NC State horticultural department has a great publication here.

Hot compost
The complication in composting comes with getting the ratios of carbon and nitrogen correct, and maintaining the correct moisture level, in HOT composting.  Ideally, with the right conditions, the compost pile will heat up enough to kill weed seeds, pests, and disease; and it composts REALLY fast.  But slow compost is better than no compost!  So if you don't have the time to research hot composting, don't worry about it.


Tuesday, November 1, 2011

Starting a Home Vegetable Garden

When I first decided I wanted a vegetable garden 3 years ago, I faced many questions:
  • What do I want to grow?
  • Do I want to buy plants, or start from seed?
  • When do I plant?
  • How do I plant?
  • How often do I water?
  • Is that a good bug or a bad bug?
  • Is that a weed or one of my seedlings?

Needless to say, I was slightly overwhelmed.  Luckily, however, I started small.  That first spring, I planted five 4'x4' raised beds.  And I tried a wide variety of plants and techniques.  Some of the crops I tried were complete and utter failures--so don't be discouraged if this happens to you!  Other crops did great.

Gardening is a dynamic process, so you have to be willing to try new things and accept failures before you will find what works for you and your space.  Here are a few general tips that I would share with a first-time gardener:

Tips for first-time home vegetable gardeners:
  • Start small--Only plant an area that you can manage, remembering that gardening is hard work and requires frequent watering and weeding.  A single 4'x4' bed may be plenty for you.
  • Plant varieties that do well in your area --Buy seeds from a local seed company, or buy plants from the farmers market.  Ask gardener friends what varieties they have had success with, or refer to publications like this blog that describe gardening in your specific region.
  • Compost!--If the area you are going to plant has poor soil, it is important that you add compost to amend it.  You can either make your own, or buy compost locally.
  • Raised beds or hills--Plants do best in rich, loose soil, with plenty of drainage.
  • Make it a family project--This way everyone is involved and proud of the garden, and the labor is spread between multiple individuals.  Gardening is a great, healthy activity for kids!
  • Don't be afraid of failure!--You won't know what works for you and your yard until you try!
As part of this blog, I plan on describing when, how, and what I plant, which should provide a good guide for home gardeners in central North Carolina.  But keep in mind, that every garden and person is different, so be adventurous in your garden!
Related Posts Plugin for WordPress, Blogger...